Explore your WordPress website’s potential by installing plugins. Follow this simple guide to install plugin in WordPress and choose the right plugins to suit your website’s requirements.
Steps to Install Plugin in WordPress
To install a plugin in WordPress there are 2 different ways by installing plugins automatically and uploading the plugin manually. Follow these steps:
i. Automated Installation
Login to your WordPress Dashboard:
Go to the login page of your WordPress website and enter your credentials (username and password) to access the Dashboard.
1. Navigate to the Plugins section
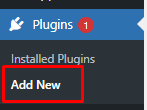
Once you’re logged in, look for the “Plugins” option on the left-hand menu. Click on it to access the Plugins page.
2. Click on “Add New”
On the top of the Plugins page, you’ll see the “Add New” button. Click on it to proceed with the installation.

3. Search for the Plugin
In the search bar, type the name or a relevant keyword of the plugin you want to install. WordPress will display a list of plugins that match your search.

4. Select the Plugin
Find the plugin you want to install from the search results and click the “Install Now” button located next to the plugin’s name.
5. Activate the Plugin
After installation is complete, the “Install Now” button will change to “Activate.” Click on it to activate the plugin on your WordPress website.
ii. Uploading Plugin Manually
To upload a plugin to your WordPress website manually.
1. Download the Plugin
Firstly, download the plugin files by uploading it from your computer. Search for WordPress plugins on the official WordPress plugin directory or from third-party sources. You have download the plugin as a ZIP file for manual uploading.
2. Upload Plugin
On the top of the Plugins page, click on the “Add New” button. After that, you will see a new page with the option “Upload Plugin.” Click on this button to proceed with the manual upload.

3. Choose the Plugin ZIP File
You can see the “Choose File” button option and select the plugin by uploading a ZIP file which you have downloaded previously from your computer. Once selected, click the “Install Now” button.

4. Plugin Settings
Depending on the plugin you installed, you might need to configure its settings. This can typically be done from the plugin’s page in the “Plugins” section or through a separate settings page added by the plugin.
That’s it! You have successfully installed and activated a plugin on your WordPress website. Now, the new functionality or features provided by the plugin should be available for use on your site.

