Create a user friendly shopping experience with the help of this guide and learn to give proper structure to your product categories and attributes. Follow these simple steps to organize product categories in WooCommerce and optimize the product heirarchy efficiently.
A. Introduction to Product Taxonomy
Product taxonomy refers to the structured classification and organization of products within an e-commerce platform or inventory management system. It’s akin to a detailed map or hierarchy which is helpful in categorizing products in a way that makes them easy to find and manage.
B. Importance in E-commerce and Inventory Management
1. Improved Searchability and Navigation
A well-organized taxonomy helps customers quickly find products they are looking for. It enhances user experience by making search and browsing more intuitive, which can lead to higher customer satisfaction and increased sales.
2. Efficient Inventory Management
For businesses, an effective taxonomy aids in managing inventory more efficiently. It allows for better tracking of stock levels, trends, and product performance, which helps in making informed decisions about purchasing and stock replenishment.
3. Enhanced Data Analysis
A structured product taxonomy provides valuable insights into customer preferences and buying patterns. By analyzing product categories, tags, and attributes in WooCommerce such businesses can tailor their marketing strategies and optimize their product offerings.
4. Consistency and Scalability
As a business grows, having a standardized taxonomy helps maintain consistency across different product lines and channels. It ensures that new products are integrated seamlessly into the existing structure, facilitating scalability.
C. Components of Product Taxonomy
1. Categories
- Definition
Categories are broad groupings of products that share similar characteristics or functions. They represent the primary classification of products within your store.
- Examples
In a clothing store, categories might include “Men’s Clothing,” “Women’s Clothing,” and “Children’s Clothing.” Each category can have multiple subcategories (e.g., “Men’s Shirts,” “Women’s Dresses”).
2. Tags
- Definition
Tags are keywords or labels that provide additional information about products. They help describe specific attributes or themes associated with the product, making it easier for customers to find products with certain characteristics.
- Examples
Tags might include “Summer Collection,” “Eco-Friendly,” or “Sale” Tags can be applied to products across different categories to highlight specific features or promotions.
3. Attributes
- Definition
Attributes are specific characteristics or features of products that can be used to filter and sort items within a category. They provide detailed information about individual products and help customers refine their search.
- Examples
Common attributes include “Size,” “Color,” “Material,” and “Brand.” For instance, a product in the “Men’s Shirts” category might have attributes such as “Size: M, L, XL” and “Color: Red, Blue, Green.”
D. Steps to Create and Organize Product Categories in WooCommerce
1. Log in to Your WordPress Dashboard
Navigate to yourwebsite.com/wp-admin and log in with your admin credentials.

2. Setting Up Product Categories in WooCommerce
2.1 Navigate to Products
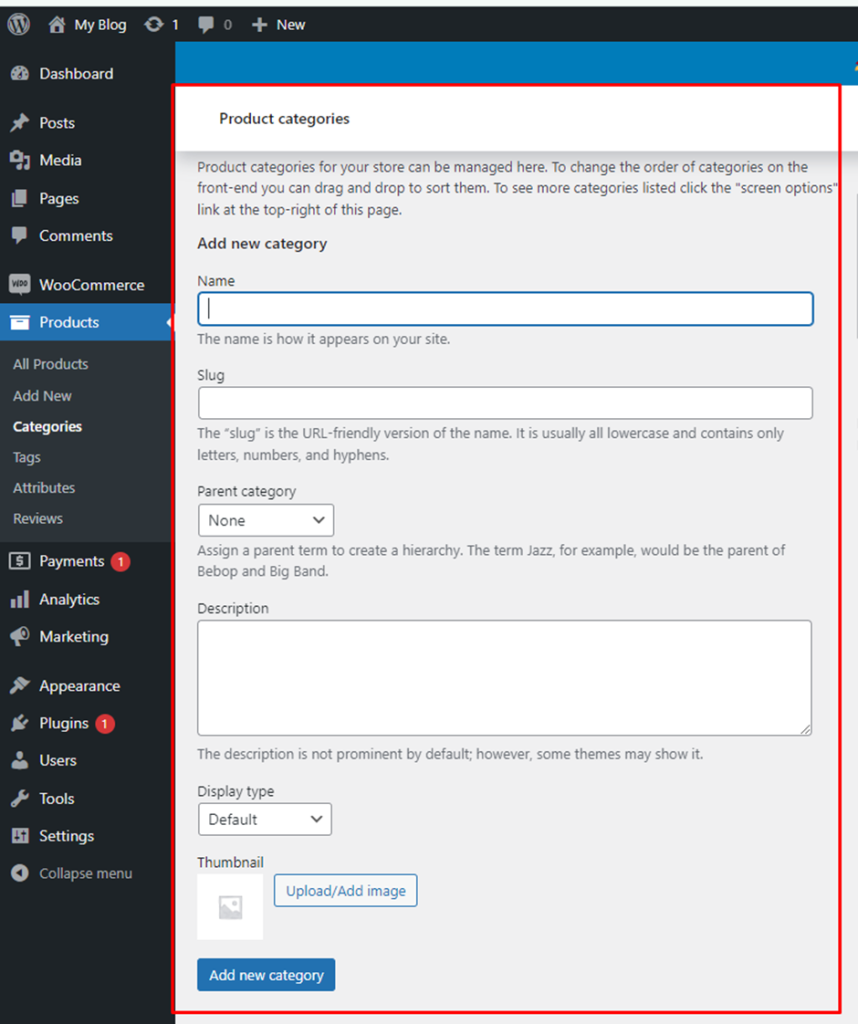
In the left-hand menu, click on “Products.”

2.2 Go to Categories
Click on “Categories” under the Products menu.

2.3 Add New Category
- Name: Enter the name of the category (e.g., “Clothing”).
- Slug: Enter a URL-friendly version of the category name (optional).
- Parent Category: Select if this category is a parent or a subcategory.
- Description: Add a description for the category (optional).
- Thumbnail: Upload an image for the category (optional).
2.4 Click “Add New Category”
Save the new category.
2.5 Repeat for Subcategories
Create subcategories by selecting a parent category when adding a new category.

3. Adding Tags to Products
3.1 Go to Tags
Click on “Tags” under the Products menu.
3.2 Add New Tags
- Name
Enter the name of the tag (e.g., “Summer Collection”).
- Slug
Enter a URL-friendly version of the tag name (optional).
- Description
Add a description for the tag (optional).
- Click ‘Add New Tag’
Save the new tag.
- Assign Tags to Products
While editing or adding a product, you can add tags in the “Product Tags” section by typing in the tags and clicking “Add.”

5. Setting Up Product Attributes
5.1 Find the Products Section
Click on “Products.” option available on the left-hand menu of your WooCommerce.
5.2 Go to Attributes
Click on “Attributes” under the Products menu.
5.3 Add New Attributes
- Name
Enter the name of the attribute (e.g., “Color”).
- Slug
Enter a URL-friendly version of the attribute name (optional).
- Default Sort Order
Select how you want the attributes to be sorted.
- Click on “Add Attribute”
Save the new attribute.

6. Adding Products Categories, Tags, and Attributes
6.1 Navigate to Add New Product
In the left-hand menu, click on “Products” and then “Add New.”
6.2 Enter Product Details
- Product Name
Enter the product title.
- Description
Add a detailed description in the main editor.

- Assign Categories
On the right side, in the “Product Categories” section, check the boxes for the appropriate categories and subcategories.

- Add Tags
In the “Product Tags” section, enter relevant tags and click “Add.”

6.4 Add Product Attributes
- Scroll down to the “Product Data” section.
- Go to the “Attributes” tab.
- You can see the dropdown menu and choose an attribute and then click on “Add New.”
6.5 Configure Attribute Values
- For each attribute you can enter the values like for color choose “Red or Blue”.
- Check the box for “Visible on the product page” if you want the attribute to be displayed to customers.
- Click “Save Attributes.”

6.6 Product Short Description
Add a brief description in the “Product Short Description” section below the main editor.

6.7 Set Product Image
- Click on “Set product image” in the “Product Image” section for setting an image.
- For uploading an image you can choose an image from the media library.

6.8 Add Product Gallery Images
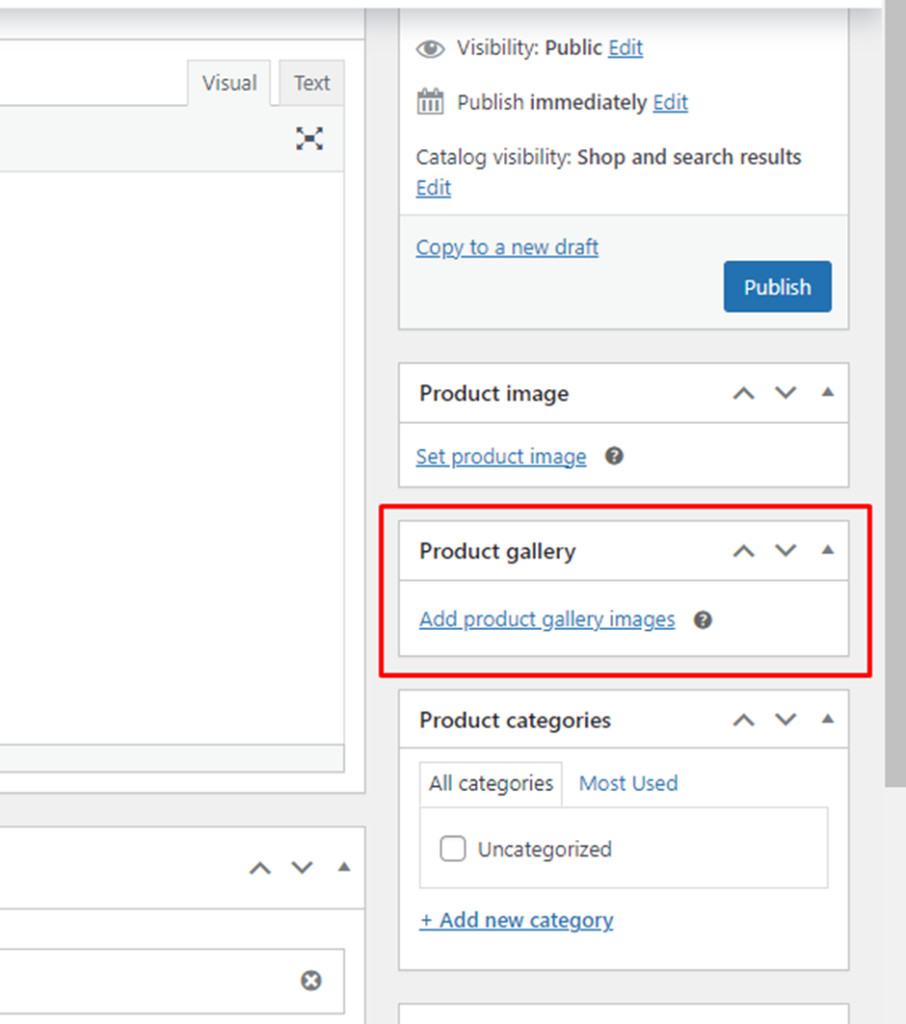
If you want to add additional images for your product then click on “Add product gallery images.”

6.9 Publish Product
After setting your product categories click on the “Publish” button on the right side corner to make your products live.

7. Maintaining and Updating Product Categories
7.1 Regular Reviews
- Periodically review your product categories, tags, and attributes in WooCommerce section to ensure they are up to date.
- Go to “Products” > “Categories,” “Tags,” and “Attributes” to make any necessary changes.
7.2 Incorporate Customer Feedback
- Use feedback from customers to refine your categories, tags, and attributes.
- Update your product listings accordingly.
7.3 Monitor Performance
- Use tools like Google Analytics and WooCommerce reports to analyze how well your product taxonomy is performing.
- Adjust your taxonomy based on the data to improve user experience and sales.
Using the above steps, you can master product taxonomy by organizing product categories, tags, and attributes in WooCommerce.

