WooCommerce is a popular platform for creating online stores. The default WooCommerce Login page is functional but may not match your brand or website design.
This guide will show you how to customize the WooCommerce Login page to match your brand and improve user experience. Whether you’re a seasoned WordPress developer or a beginner, you can follow these steps to create a login page that is both visually appealing and easy to use.
Table of Contents
- Why it is needed to create a Custom Woocommerce Login Page?
- How to Customize the WooCommerce Login Page?
- 1. Activate WooCommerce Login Page /Registration Form
- 2. Replace My Account Page with Customized Forms
- 3. Manage Registration and Login Form Fields
- 4. Customize WooCommerce Login Page /Registration Page Styles
- 5. Preview Your Customized WooCommerce Login Page
- 6. Extend the Login/Registration Form’s Reach
- 7. Verify the Pop-up Login Form on the Frontend
- Best Practices for Enhancing Your WooCommerce Login Page with Custom Fields
- How to Resolve Common Issues with WooCommerce Login Page Fields?
- Conclusion
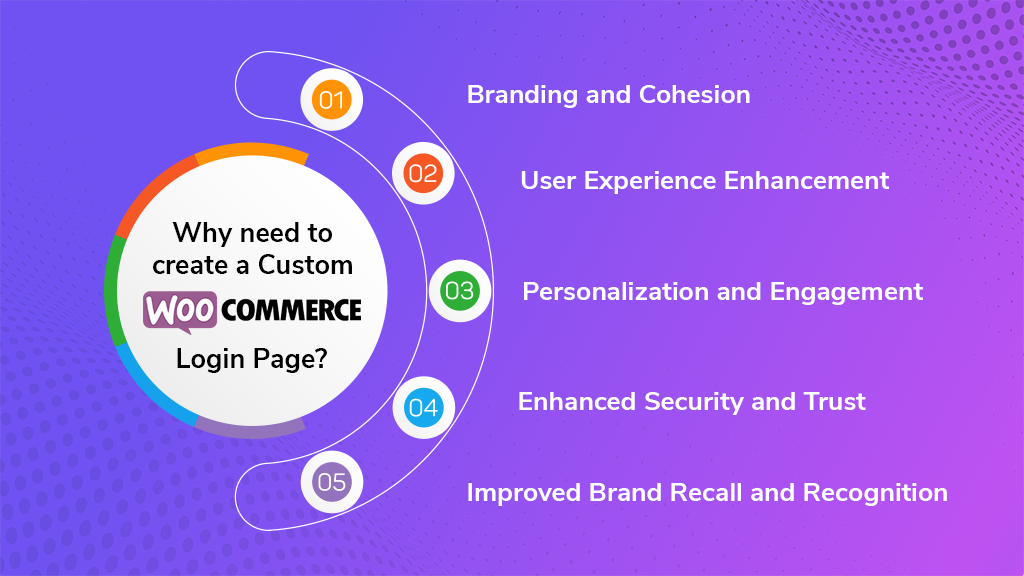
Why it is needed to create a Custom Woocommerce Login Page?

Creating a custom WooCommerce login page offers many benefits, enabling you to personalize the user experience and enhance your website branding. Here are some compelling reasons why you should consider customizing the Login page:
1. Branding and Cohesion
A customized Login page allows you to seamlessly integrate the login experience with your website’s overall design and branding. This ensures consistency and reinforces your brand identity, creating a more cohesive and professional online presence.
2. User Experience Enhancement
Tailoring the Login page to your specific needs can significantly improve the user experience. You can adjust form fields, modify labels, and optimize the layout to create a more user-friendly and intuitive login process.
3. Personalization and Engagement
Customizing the Login page allows for personalizing the user experience and fostering engagement. You can add welcome messages, display relevant promotional content, or even incorporate social media login options to enhance customer interactions.
4. Enhanced Security and Trust
Customizing the Login page allows you to implement additional security measures, such as CAPTCHA verification or two-factor authentication, to protect customer accounts and instill trust in your brand.
5. Improved Brand Recall and Recognition
A well-designed and branded Login page can leave a lasting impression on your customers, increasing brand recall and recognition, and leading to repeat purchases and customer loyalty.
How to Customize the WooCommerce Login Page?
The Login/Signup Popup plugin provides a straightforward and cost-effective method for customizing the WooCommerce customer login experience on your website’s front end. This plugin offers two convenient form options: an inline form and a pop-up form, allowing you to seamlessly integrate the login process into any desired area of your website. Additionally, the plugin can automatically replace the default My Account login/registration form.
To embark on customizing your WooCommerce customer login, commence by installing and activating the Login/Signup Popup plugin on your WordPress website. This straightforward process will pave the way for a personalized and enhanced login experience for your customers.

1. Activate WooCommerce Login Page /Registration Form
Once the plugin is activated, a new tab labeled “Login/Signup Popup” will appear in the WordPress Admin panel. Navigate to this tab to proceed with the customization process.
Under the “General” tab, verify that the following options are checked:
- Enable Registration
- Auto Login User on Sign Up
- Handle Reset Password
These options are typically enabled by default after installing the Login/Signup Popup plugin, but it’s advisable to double-check to ensure they are active. Additional settings are available in this section that you may want to configure, such as selecting the user role for newly registered users or specifying a login redirect page.
2. Replace My Account Page with Customized Forms
Locate the “WooCommerce Settings” section and activate the following options if they are not already enabled:
- Replace My Account form
- Replace checkout login form
By enabling these settings, you can eliminate the need for manual form modifications and allow the plugin to automatically replace the default My Account page registration/login form and checkout login form with your customized versions. This streamlined approach simplifies the customization process and ensures consistency in the user experience.
3. Manage Registration and Login Form Fields
While still under the “General” tab, locate the “Registration Fields” section and click the “Manage” link. This will open a dedicated area for customizing the WooCommerce login and registration forms. You can add or remove fields, modify their settings, and customize the overall appearance of the forms.
To include a field on the login or registration form, click the checkbox next to the field name. This will mark the field as “Active“.
For each active field, you can customize various settings, such as:
i. Placeholder text
Edit the placeholder text that appears within the field to provide users with clear instructions on what information to enter.
ii. Maximum characters
Set a maximum character limit for the field to prevent users from entering excessively long data.
iii. Auto-filling
Enable auto-filling for specific fields, such as billing and shipping information, to streamline the data entry process for users.
Once you’re done customizing the fields and their settings, click the “Save” button to apply the changes.
4. Customize WooCommerce Login Page /Registration Page Styles
Navigate to the “Settings” tab to access a comprehensive set of options for styling and customizing the WooCommerce login and registration forms. This tab provides granular control over the appearance and behavior of the forms.
Here are some of the customization options available:
i. Display icons
Enable or disable the display of icons next to form fields for enhanced visual appeal and user guidance.
ii. Adjust icon size
Customize the size of the icons to match your desired aesthetic and ensure they are appropriately scaled.
iii. Modify container width
Set the width of the form container to control its alignment and responsiveness across different screen sizes.
iv. Alter icon and background colors
Choose the colors for the icons and their background to match your brand identity and overall website design.
v. Select border color
Define the border color for the form elements to create visual separation and enhance the overall appearance.
vi. Specify bottom margin
Set a consistent bottom margin for all form fields to maintain visual balance and provide adequate spacing.
vii. Choose input field background color
Select the background color for the input fields to personalize the forms further and ensure they align with your website’s color scheme.
Continue exploring the page, as there are numerous additional customization options available to tailor the WooCommerce login and registration area to your specific preferences.
5. Preview Your Customized WooCommerce Login Page
To witness the outcome of your customization efforts, log out from your admin account or open an incognito browser window. Next, visit the “My Account” page of your WooCommerce store. You will now see the newly customized WooCommerce login form, incorporating the fields and styles you have specified.
The “Sign Up” tab serves as the registration form, displaying all the fields you have chosen to include. For instance, in this tutorial, we opted to request customers’ first and last names, email addresses, passwords, and acceptance of the terms of service.
6. Extend the Login/Registration Form’s Reach
The plugin extends its capabilities beyond the default My Account and checkout pages, allowing you to incorporate the login/registration form into other areas of your WooCommerce store. To achieve this, navigate back to Login/Signup Form Popup > Settings and select the “Info” tab. This page provides detailed instructions on how to display the WooCommerce login form using various methods.
Here are the available options:
i. Trigger a pop-up login/signup form:
Initiate a pop-up login/signup form by utilizing the menu, a specific link, a class, or a shortcode.
ii. Embed an inline or pop-up login form using a shortcode
Insert a shortcode to display either an inline or pop-up version of the login form directly within the content of your website.
To display the pop-up version of the WooCommerce login form, follow these steps:
- Access a Content Editor:
Navigate to a page, post, or widget area within your website’s content editor. - Insert Shortcode Block:
Add a Shortcode block to the content area using the available block insertion options. - Paste Pop-up Form Shortcode:
Locate the pop-up form shortcode from the previous page and paste it into the Shortcode block. - Save Changes:
Click the “Update” or “Publish” button to apply the changes and display the pop-up login form in the specified location.
7. Verify the Pop-up Login Form on the Frontend
To confirm the successful implementation of the pop-up login form, switch to the frontend view of your website and navigate to the area where you inserted the login shortcode. Ensure that you are logged out of your Admin account to properly visualize the form.
For a pop-up login form, you’ll notice a “Login” link. Upon clicking this link, a pop-up window will appear, presenting the login form. In contrast, the inline form directly displays the entire form within the page content.
Best Practices for Enhancing Your WooCommerce Login Page with Custom Fields
When incorporating custom fields into your WooCommerce registration form, it’s crucial to adhere to best practices to guarantee a positive user experience and maximize the advantages of customization. Here are some key best practices to keep in mind:
1. Relevance and Necessity
Ensure that the custom fields you add are relevant to your business and target audience. Adding unnecessary fields can overwhelm users and hinder the registration process.
2. Field Quantity
Limit the number of fields to those that are essential for gathering the necessary information. A cluttered registration form can discourage users from completing it.
3. Field Type Selection
Choose the appropriate field type for the data you’re collecting. For instance, use text fields for names and email addresses, dropdown menus for selecting options, and checkboxes for multiple choices.
4. Logical Field Arrangement
Organize the fields on your registration form in a logical order, grouping related fields to enhance user navigation and understanding.
5. Data Validation
Implement validation rules for your custom fields to ensure the accuracy and completeness of the information entered by users. This helps prevent errors and incomplete registrations.
6. Responsiveness
Ensure that your custom registration form fields are responsive and adapt seamlessly to different devices and screen sizes, providing a consistent user experience across various platforms.
7. Regular Testing
Regularly test your custom registration form fields to verify their functionality and ensure they provide a seamless and positive user experience. This proactive approach helps identify and address any potential issues promptly.

How to Resolve Common Issues with WooCommerce Login Page Fields?
Occasionally, when attempting to create a registration form for WooCommerce, you may encounter technical difficulties. This section guides resolving common issues arising from the WooCommerce login page’s registration form fields.
Issue #1: Registration Form Not Displaying
In some instances, despite configuring the registration form, it may not appear on the intended page. To address this issue:
1.1 Verify WooCommerce Installation
Ensure that WooCommerce is correctly installed and activated on your WordPress website.
1.2 Check Account Creation Settings
Navigate to WooCommerce > Settings > Accounts & Privacy. Verify that the following options are enabled:
“Allow customers to create an account during checkout”
“Allow customers to create an account on the ‘My Account’ page”
Occasionally, when attempting to create a registration form for WooCommerce, you may encounter technical difficulties. This section guides resolving common issues arising from WooCommerce registration form fields.
Issue #2: User Input Not Saving in Registration Form Fields
In some cases, you may encounter a situation where users are unable to enter their details into the registration form.
2.1 Identify Plugin or Theme Conflicts
Deactivate other plugins one by one and switch to a default theme, such as Twenty Twenty-One, to determine if any plugins or themes are causing conflicts with the registration form functionality.
2.2 Check for Plugin Compatibility
If the issue persists, check the compatibility of the plugins you are using with the latest version of WooCommerce. Occasionally, compatibility issues can arise due to outdated or incompatible plugins.
2.3 Review Theme Code
If the issue remains unresolved, review the theme code for potential conflicts with the registration form. Look for any code that might be interfering with the form’s functionality or data processing.
2.4 Seek Plugin or Theme Support
If you are unable to identify or resolve the conflict yourself, reach out to the developers of the plugin or theme you are using for further assistance. They may be aware of known issues or provide specific troubleshooting steps.
Issue #3: Email or Username Already Exists
Occasionally, when users enter their email address or username during registration, they may encounter an error message indicating that the email address or username is already in use. This message can sometimes appear even with unique email addresses.
To prevent this issue, consider the following approaches:
3.1 Implement Email and Username Validation
Ensure that the registration form checks for existing users with the same email address or username before allowing users to proceed. If a duplicate entry is detected, display an appropriate error message informing the user that the email address or username is already associated with an existing account.
3.2 Utilize Social Media Login Plugins
Consider using a plugin, such as “User registration,” to enable users to register with their existing social media accounts. This eliminates the need for users to create new email addresses and usernames, reducing the likelihood of duplicate account creation errors.
3.3 Clear Cache and Cookies
Sometimes, cached data or browser cookies can interfere with the registration process, leading to erroneous error messages. Instruct users to clear their cache and cookies before attempting to register again.
3.4 Database Cleanup
In rare cases, duplicate user entries may exist in the database due to technical glitches or data corruption. Consult a WordPress developer or database administrator to investigate and eliminate any duplicate entries.
Conclusion
Personalizing the WooCommerce customer login page is a valuable step towards enhancing the user experience on your online store. Remember, the WooCommerce login page serves as a crucial entry point for your customers, and a well-designed login experience can foster customer satisfaction and encourage repeat visits. By investing the time and effort to customize this essential page, you can significantly improve the user experience and contribute to the overall success of your WooCommerce store.


